Posts tagged #fire

Adventures In Smoking

Assembling the pieces

Assembling the pieces

After a recent fishing trip I found myself furnished with a rather fine rainbow trout; it didn't feel like a whole-cooked fish kind of night so I thought it was the perfect time to have a crack at smoking. I managed to cobble together a smoker from things I had lying around and made a recipe inspired by the Whole Larder Love book and various episodes of River Cottage. It was surprisingly easy and I'm very happy to report that the results were spectacular.

Building Your Smoker

  • For the main chamber of the smoker I used the tin from some Royal Dansk Danish Butter Cookies, the kind you always find yourself with but can never quite remember where they came from. I pierced holes in the lid to let the smoke out.
  • For the smoking rack I used a baker's cooling rack and cut it into a circle the same diameter as the tin. I left a couple of centimeters on a few of the horizontal bars and bent them over so that the rack sat away from the bottom of the tin.
  • I put a couple of handfuls of shavings into the bottom of the tin. There seems to be a lot of discussion about the best wood to use for this, but I had a pile  left over from carving spoons which I used, it was mainly birch.
  • For a heat source I had the burner from my Trangia. You can use a gas hob or stove top but I didn't want to stink the house out with smoke so a portable option was preferable.
Ready

Ready

Cooking Method

  • Firstly I descaled, cleaned and filleted the trout.
  • I made a rub that was 2 parts salt and 1 part brown sugar and gave the fish an all over coating. This was left in a sealed Tupperware container overnight in the fridge.
  • The next evening I washed the fish, removing the excess rub and patted it dry.
  • I placed the fillet inside the tin skin side down, closed the lid and lit the burner.
  • After a couple of minutes smoke was billowing out of the holes in the lid. I gave each fillet about 10-12 minutes which seemed perfect.
The finished piece.

The finished piece.

The fish was moist and tender, and it crumbled perfectly. It had a deep-infused smokiness and that salty smoked-fish tang. It was so morish I wolfed the first fillet down immediately. I saved the second for breakfast and had it on an English muffin with a poached egg. Perfect.

Posted on March 6, 2017 and filed under Recipe.

New Hampshire Maple Syrup

Syrup Making

Syrup Making

We did it, we made our own maple syrup! Myself and the Mrs we're invited to New Hampshire to spend a day (and a lot of a night) making syrup. We had a fantastic time. While I'm sure most serious syrup makers would frown upon some of the finer points of our process, we gathered sap and boiled and bottled our very own syrup.

Although very time consuming it was really easy. We helped gather 14 gallons (53 litres) of sap from some pre-tapped sugar maples. We then built a big fire and sat out all day with some local beers tending and topping up the reducing syrup. From our 14 gallons we ended up with just 1.8 pints (850ml.)

Collecting Sap

Collecting Sap

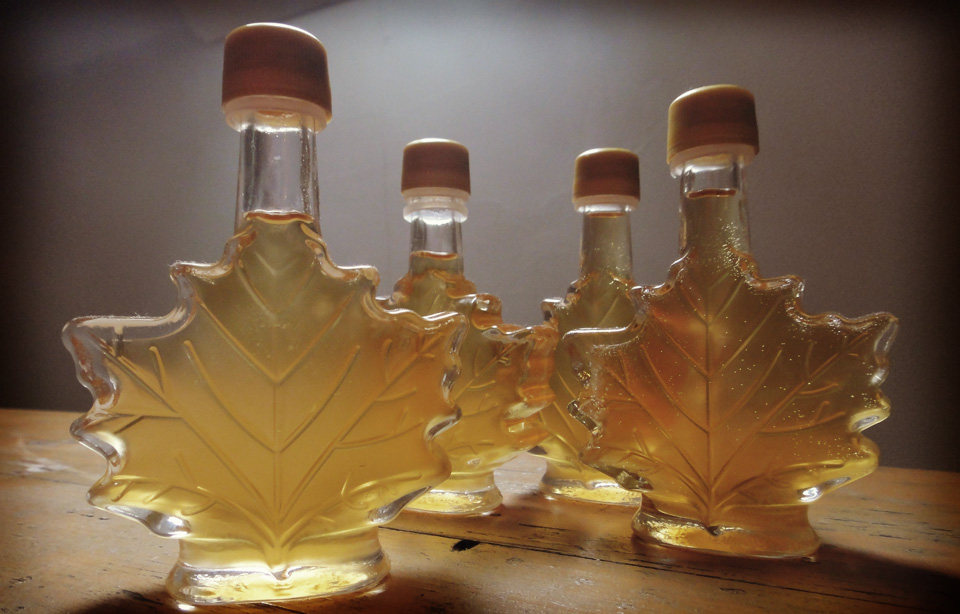
This was put into the token, sterilized, maple leaf shaped bottles and left to cool. An initial tasting was unlike any syrup I've ever had. It is often said the real deal is a million miles from the store bought stuff, and while we do buy local Maine syrup, this was indeed very different. Unmistakable as maple syrup but with a caramel taste to it as well. Lighter in colour and a little less brash, it is fantastic and will be treasured through-out the year.

VHD Syrup

VHD Syrup

Big thanks to the Nimmos in New Hampshire for showing us the ropes and letting us take more than our share of the finished product. I can't wait to do it again next year.

Posted on March 19, 2012 and filed under Recipe.

Bannock

Cooking Bannock

Cooking Bannock

Living in a city (a small one none the less) I rarely get chance to have a fire and it just didn't feel right making my first bannock without one. Fortunately I was invited to New Hampshire to make maple syrup. This was the perfect excuse to try out my frying pan bread skills.

Bannock is an easy to make, no nonsense bread. Although it has Scottish roots it was also a favorite among native Americans as well as hikers, woodsmen and outdoors types. I came across a great number of recipes online and in various publications, they all have a similar base with other flourishes. The most detailed documentation was in Bradford Angier's "Home in Your Pack."

Angier's basic recipe and his method are as follows.

One cup flour
One teaspoon baking powder
One fourth teaspoon salt

Mix these dry ingredient if starting from scratch, taking all the time you need to do this thoroughly. Have the hands floured and everything ready to go before you add liquid. Make sure your frying pan is warm and greased.

Working quickly from now on, stir in enough water to make a firm dough. Shape this, with as little handling as possible, into a cake about an inch thick.

Lay the bannock in the warm frying pan. Hold it over the heat until the bottom crust forms, rotating the pan a little so the loaf will shift and not become stuck.

Once the dough has hardened enough to hold together, you can turn the bannock. This, if you’ve practiced a bit and have the confidence to flip strongly enough, can easily be accomplished with a slight swing of the arm and a snap of the wrist. Or you can use one of the plate from your cooking outfit, sliding the bannock onto this and reversing the frypan over the plate and turning both together.

When is the bannock done? After you’ve been cooking for them a while, you will be able to tap on one and gauge this by the hollowness of the sound. Meanwhile test by shoving in a clean straw or sliver. If any dough adheres, the loaf needs more heat. Cooking can be accomplished in about 15 minutes.
— Bradford Angier - Home in Your Pack, 1965

I made a double batch and also added: fresh blueberries, 3 tablespoons of butter and an extra pinch of baking powder. These are all Angier's recommendations for a tastier loaf.

Bannock Ready To Eat

Bannock Ready To Eat

I cooked exactly as advised and the results were fantastic. Crusty and toasted on the outside, fluffy in the middle with small blueberry explosions. Awesome with a little butter and some maple syrup. Looking forward to experimenting with different flavors. Cheese and olive spring to mind.

Posted on February 28, 2012 and filed under Recipe.